Showing posts with label Edible Art. Show all posts

Friday, January 12, 2018

2018: 12/365


Sometimes creativity is splashing paint across a canvas, drawing in my sketchbook, writing a new story, looking through the lens of a camera...
SO many possibilities!

Today, creativity was tweaking an old chocolate chip cookie recipe
to suit new dietary needs!

In case you're interested...

Chocolate Chip Cookies for Everyone
(vegan, gluten-free, and delicious!)
makes 5 dozen cookies

cream together:
1 cup organic sugar
1 cup brown sugar

then add:
6 tablespoons aquafaba
1 teaspoon vanilla

then slowly mix in:
2 cups gluten-free 1-to-1 flour 
(I use Bob's Red Mill 1-to-1 Gluten-Free)
2 1/2 cups gluten-free rolled oats (pulsed until a coarse flour)
1/2 teaspoon salt
1 teaspoon baking powder
1 teaspoon baking soda

finally, mix-in:
1, 12oz. bag (vegan) chocolate chips

Roll dough into 1" balls and place 2 " apart on parchment paper lined cookie sheets.  Bake at 375 degrees fahrenheit for 10 minutes.  (If baking 2 cookie sheets at a time, switch racks halfway through.) 


Tuesday, October 16, 2012

Feeding My Addiction

Nutella Love

I am absolutely addicted to Nutella.  So, when I saw this recipe for 3 Ingredient Nutella Brownies on pinterest (thank you Aimee!), I had to bake a batch immediately.  

They were so quick and easy (and they taste even better in the shape of a heart). But, I have to admit that straight off the spoon will probably always be my favorite way to eat Nutella!


p.s.  It's "Blogtoberfest" and I'm posting everyday...  
Please be sure to come back tomorrow!


Friday, April 15, 2011

Tutorial: Chocolate Covered Peep Pops


If you're a regular reader of my blog, you know how much I love making cake pops!  If you're new here - Welcome!
(You can find past cake pop posts here, here, and here.)


As much as I love cake pops, they can be time consuming...  Since life can be busy, especially around holidays, I love creating quick and easy treats (without sacrificing cuteness, of course)!  My Easter time solution?

Chocolate Covered Peep Pops!


Supplies:
Peeps Marshmallow Bunnies
Milk Chocolate Candy Wafers
6" Lollipop Sticks
Styrofoam Block

Optional (but highly recommended) Supplies:
Clear Plastic Treat Bags
Twist Ties
Brightly Colored Ribbon


- Start by separating the peeps - set them aside.

 - Melt the candy wafers in a microwave safe bowl according to the package directions.


- One at a time, hold the peep by the ears and dip the bunny body into the melted chocolate, shaking off any excess.

- Take a lollipop stick and insert it into the bottom of the bunny body.


- Give the stick a few light taps against the side of the bowl to remove any remaining excess chocolate.

- Once dipped, place the bunnies in the styrofoam block to dry.


- After the bunny bodies are dry, it's time to dip the ears.

- One at a time, hold the bunnies by their stick and carefully dip the ears in the melted chocolate.  (Take care to shake & tap off any excess chocolate before returning them to the styrofoam block.)

- After the chocolate is completely dry, you can individually wrap each Peep Pop in a clear plastic treat bag, secure with a twist tie and add a ribbon...


Baskets of bunnies make an adorable centerpiece or a wonderful hostess gift!

I am sharing this fun and easy tutorial with:


and


Enjoy!

Tuesday, March 22, 2011

Turtles and Babies, Oh My!


This post contains cuteness to the extreme:
Enter at your own risk!


Bob's cousin and his wife are expecting their first baby, and as a gift I painted their nursery walls to coordinate with the Turtle Reef bedding and canvases they bought.


For the baby shower this past weekend, I made a turtle diaper cake...


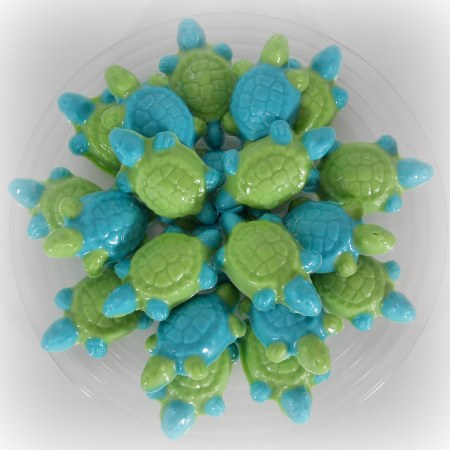
And turtle candies!
(I think this photo looks like an edible mandala.)


You may remember from this post (and this one too) how much I love cake pops!  Well, among family and friends I've sort of become the go-to gal for them.  I definitely couldn't pass up the opportunity to create these little guys!

Crazy cute, right?!?
(I warned you!)


Tuesday, March 15, 2011

Creative Tuesday: Breakfast


"French Toast"
Photo with Colored Pencil

I'm not quite sure why my mind always seems to immediately head to the nearest pun... Maybe it's because when I was in art school my professors always said, "Stay away from corny and cliched art" and now I'm rebelling... Maybe it's a sickness... Maybe I'm just plain silly.

Whatever it is... It's fun!

For this punny piece of art I found a toast photo here, then I drew on the eiffel tower with colored pencil.  Ahhh, but of course, eet iz how you make zee "French Toast"!  Oh la la!

Since I'm on the subject, I would like to offer a "toast" to our host...


How could I resist?!?

Please be sure to visit Mr. Toast's blog to see what my Creative Tuesday friends have cooked up for the "Breakfast" theme!

And don't forget - Paint Party Friday starts this Friday!!!


Tuesday, December 28, 2010

Edible Art Love

"Eating Manhattan"  3 ft.x 4ft. chocolate chip cookie map

I am a big believer that art comes in many forms... including edible.  My first "official" edible art piece was created in one of my college art classes.  (Although the beginning of my edible art creation can be traced all the way back to second grade:  I remember sitting at the kitchen table with my mom using food coloring to paint faces on marshmallow snowman "sculptures".)

My love of edible art was renewed a couple of years ago when I stumbled upon the truly amazing baking blog, Bakerella.  Angie Dudley (a.k.a. Bakerella) is the Queen of Cupcake Pops and edible artist extraordinaire.  I have been so inspired by all of her unbelievably creative confectionery wonders.  (If you read my last post you will be happy to learn that I did receive Bakerella's new book for Christmas and it is fantastic!) 


These were the very first cupcake pops I ever made.  I made 48 pops and painted 2 terracotta pots to give as hostess gifts for a couple of 4th of July parties I was invited to.


I was bitten by the cupcake pop bug and created these fun beach bears a few weeks later for T-man's pool party! 


I also made this Woman's Day inspired cake (complete with coconut bra wearing hula bears)!


I've created pops for bake sales...


And teacher appreciation gifts...


I've even made them for my niece's graduation.

But my edible art obsession doesn't end there...


I love baking and decorating cookies!  I made these for Tyler's Half-Birthday Celebration at preschool last year.  He asked for "Snoopy Basketball" cookies but I couldn't find a cookie cutter... so I created a stencil to cut out the dough then drew on them with royal icing.


Smiles to you, my fabulous blogging friends...

No matter what medium you choose, I hope today (and every day) finds you creating some sweet art and even sweeter memories!

Friday, December 24, 2010

Sweet Holiday Greetings


In order to get ready for the holidays, I've assembled an army of snowmen inspired by my baking hero, Bakerella.  (I'm keeping my fingers crossed that Santa brings me her new book!)


As I've mentioned before, I love handmade gifts...
This year for my neighbors I made snowman cake pops, candy coated oreos, and lightbulb candy pops.  Normally I paint terra cotta pots in a matching theme, but since I was running short on time I used these adorable snowman bowls I found at The Christmas Tree Shop.


The snowmen are so cute I could just eat them up

Well, I'm off to start havin' some Christmas fun, so from my house to yours...


We wish you a
ridiculously fun
holiday season!

Love,
Kristin, Tyler (a.k.a. T-man) & Bob


LinkWithin

Related Posts Plugin for WordPress, Blogger...