Showing posts with label Underpaintings. Show all posts

Friday, May 11, 2018

2018: 125-131/365


In my last post I mentioned that I took part in the Illustrator Challenge at the New England SCBWI Conference.  The theme of the challenge was Fairy Tale Mash-up, so I created "Swinederella": a combination of Cinderella, The Three Little Pigs, and a dash of Little Red Riding Hood.  It was created using pencil, watercolor, and Photoshop.

Since I love seeing how other artists create their art, I thought it would be fun to share images of my process from start to finish...

1. Thumbnail Sketch


2. Character Design


3. Clean Sketch


4. Watercolor Washes


5. Black & White Underpainting


6. Starting to Add Color


7. Final Image (after many, many layers!)


I'm still figuring things out in Photoshop, but I have a feeling that I'm really going to enjoy this way of working!

Monday, December 26, 2016

My Illustration Process: From Start to Finish!


Since I love seeing how other artists create, 
I thought it would be fun to share my illustration process 
from start to finish...


My process always begins with sketching.  At this stage, I'm trying to get a feel for the character(s), the movement, and the expressions.  I also like to try and develop a rough plan for the layout of the page(s).


Next, I create more finished drawings based on my original sketches, but making adjustments as needed.  I create these drawings on plain old copy paper (but in the size the final artwork will be in).


After my my layout is set and my drawings are complete, I use my light box to trace my drawings onto 140lb. watercolor paper.  When my original drawings have been transferred, I use a dark brown prismacolor pencil to lay in my underlying values.  (I want to get a base down so that I can see where darks, lights, shadows, and highlights will go.)


When I finish my colored pencil layer, I cover the images with clear gesso and let that dry.  Then, I put on a wash of burnt sienna fluid acrylic.  This layer adds warmth and depth to the final painting that would be difficult to achieve if I left those areas white.


Now the fun really begins... I start adding color (using acrylic paint).  I start by painting the areas that would be furthest away (in the background), then moving to areas that are closer to the viewer (in the foreground).  
I build up my paint in layers, starting with darker values and gradually lightening them.  Not only does this allow for smooth blending, it gives the final painting more depth.

(It was at this point that I accidentally dipped my sleeve into my palette and smeared it across the page as I was working. 
I don't recommend that!  Hahaha!)


When I'm adding color, I try to avoid using paint straight from the tube.  I use a porcelain enamel butcher's tray palette and mix my paints directly on the smooth surface.  Once I've mixed my colors, I transfer them to folded damp paper towels.  (This keeps them workable for a long time.)  If I spritz my paints with water and cover my palette with plastic wrap, I can use the paints I've mixed for days.  (Also, the porcelain surface is great for easy clean-up!)


I keep building on previous layers, moving around the painting (avoiding working on any one particular area for too long).  The final step is to add the last little details and the whitest whites.

(Actually, the final step for this painting was fixing my "oops" paint smear digitally!)

I hope you've found this start to finish look at my illustration process helpful...
See you in 2017!

Friday, March 7, 2014

The "Unselfie" Project: Process Pictures & Questions Answered


The response to The "Unselfie" Project has me excited, nervous, thrilled, anxious, giddy...  All good things, I think, when you're working on something new and something you're passionate about.  In addition to observations and critiques, I have been receiving lots of questions through comments, messages, emails, and phone calls!  I love the questions because they challenge me to focus on my intent and provide me with an opportunity to see things through the viewer's eyes.
So, since there are many questions that keep popping up, I thought it would be a good idea to put the answers to the "frequently asked" all in one place...


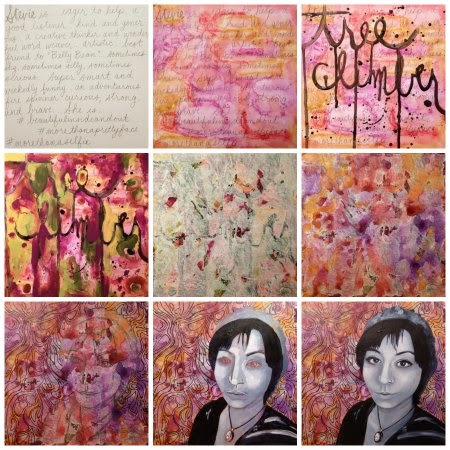
The layers of "Stevie"

What is The "Unselfie" Project?  
How did you come up with this idea?
The "Unselfie" Project is:
The unselfish desire to see beyond the "selfie"... To learn more about the layers of personality behind the photo.

This project was born from the idea that everyone wants to be seen, not just looked at, but really seen.  This project is a way for me to combine my passion for painting with my passion for kindness.


The layers of "Casey"

Where do these faces come from?
With a few exceptions, the faces come from "selfies" that were posted to either instagram or facebook.  (I also feel it's important to mention that I ask permission to paint their picture.)

How do you come up with the words that go with the paintings?
The words are a very important part of the project, they work in tandem with the painting.  People are so much more than what you see on the outside, or in a single photo.  The words describe the things you may not be able to see, but that are (some of) the qualities that make the person unique beyond their physical being. 


The layers of "Lisa"

What size are these paintings?  Are they on canvas?  What is your technique?  What medium do you use?  How do you create your backgrounds?
All of these paintings begin on an 8" x 8" square piece of 140lb. watercolor paper.

I begin each "unselfie" by writing (with an ordinary graphite pencil) about the person who I am painting.  It is a way for me to set my intentions for the piece, and they are the same words that accompany the finished painting.  After I am finished writing, I start adding some colors that remind me of the person (usually with watercolors or watercolor crayons).  Then I start playing while still thinking about the person... Just as each person is unique, so is the process.  Some of the techniques I use in my background layers include:  drippy writing (of more words inspired by the person), finger painting, stamping and stenciling (I like to cut my own stamps and stencils whenever possible), collaging papers that mean something, more painting...  I just like to build up lots of layers.

The face is painted using shades of paynes gray (acrylic).  When I paint a face I start with a quick sketch (in graphite if the background is light, or white charcoal pencil if the background is dark).  Then, I roughly paint in the values using a (fairly wide) flat brush.  I keep going back in with successively smaller and smaller brushes until I'm finished.  (Adding detail to the eyes is always the very last thing I do.)


The layers of "Patience"

What is the point of creating so many layers if you just cover them up anyway?
I love this question!  The layers add depth, both literally and figuratively, to each painting.  Just like it takes many layers of personality to create a whole person, it takes many layers to create each painting... Sometimes the layers peek through and you get a glimpse, other times the layers are hidden beneath the surface...


The layers of "Jenny"

Why aren't the faces in color?
When I was in college (many years ago!), I was taught that paintings should start with an underpainting (a monochromatic value study).  My professors explained that the better the underpainting, the more depth the subsequent painting would have.  We always added color, sometimes limited color, but we always added color on top.

It wasn't until very recently that I realized there is a beauty in the underpainting all on its own...  And for this project, leaving the underpainting "as is" seemed very appropriate...  The "exposed" portrait in shades of gray set against the vibrant background layers creates a contrast that adds even more depth to each painting.


Thank you so much for all of your comments (and questions!) about my paintings... I am so excited about this project, and all of your interest helps keep me motivated!

Monday, February 11, 2013

Faces 11 & 12

2013: 22
(prismacolor pencils)

Remember the process I told you about in my last post?
It works with paintings too!


For today's faces, I printed out copies of an underpainting I created last August...

2013: 23
(prismacolor pencils, watercolors, white gel pen)

And, started playing with the possibilities!


Tuesday, October 2, 2012

Underpainting Questions Answered

(Photo taken with my new favorite obsession, instagram.)

I have received many questions about my underpaintings (and my painting process in general), so I thought I would take this opportunity to answer them all at once (in case you're curious too)...

What kind of paint do you use?  Are these oils?  
How do you get them so smooth?
They are painted with acrylics.  I use whatever brand I happen to have closest to me when I start painting.  I use many different brands, but I personally prefer Liquitex - different brands have different consistencies, I just happen to like Liquitex the best.  I use a damp (not wet, not dry) brush for blending to achieve "smoothness".

How do you choose what color you use for your underpaintings?
When I was in college, I always used umber (raw or burnt) for my underpaintings, and I know many people use paynes gray.  Now, I choose the color based on what the final painting will be (then I choose the complement), sometimes I choose the color because of a feeling the background gives me, or sometimes even my mood... You may have already guessed, but dioaxazine purple is my favorite.

What is an underpainting? Why do you create an underpainting?  It looks like a finished painting to me.
For me, underpaintings are like sketches with paint... I am able to establish values more readily because I find it easier to focus on lights and darks when the painting is monochromatic.  It is my base layer and provides a ground that ultimately gives my finished painting more depth.

Thank you to all of the people who said that these look like finished paintings already!  I have to admit that sometimes I end up liking the underpainting better than the finished painting (which is why I always take a quality scan before moving on)!

Do you ever paint without using an underpainting?  
Do you notice a difference?
Yes, and yes.  There have been many times where I've painted without creating an underpainting first, and the majority of the time I've ended up regretting it.  I truly believe that the added depth that is achieved by doing an underpainting first is well worth the extra time it takes.

How long does it take you to create an underpainting?
 It really varies from day to day... It is usually somewhere between 45 minutes and 2 hours... If I'm "in the groove" it can be fairly quick, but some days I am nit-picky with myself, then it takes longer.  It also depends on the amount of detail and the size of the painting.  Some days I think "Oh, this will be a quick one" and I end up fussing over it longer than I thought.  And, some days I think, "This one is going to be tricky." and I end up breezing through it... I just never know what to expect (but I guess that's part of the fun!)   


What are you going to do with all of these underpaintings?
You can find an answer to that question here.

How do you create your backgrounds?  Do you hand paint them or are they patterned papers?
I use many different things to create my backgrounds, both paint and paper (and teabags, and phonebook pages, and old painting rags...).  Occasionally I use pre-made papers, but I prefer to create my own collage papers and use those instead.

Last year, I created 48 free downloadable and printable collage papers as part of my Carefree Fridays series.  If you would like to use them in your artwork (no strings attached), you can find them here.

***
I want to thank you all for your kindness, support, and questions...
I believe we all learn from each other and I'm happy to share!


p.s.  It's "Blogtoberfest" and I'm posting everyday...  
Please be sure to come back tomorrow!

Monday, October 1, 2012

Twenty Seven, The Start of Twenty Eight, and the Reason Twenty Nine Will Have To Wait...

Curly - dioxazine purple

Well, it looks like "29 Faces in September" has creeped into October (or should I say "Blogtober"?)...

This weekend, while I was painting (on walls, not faces), I did something funky to my neck.  Sitting at my painting table for more than 5 minutes at a time is unbearable, so this is where I currently am...

The start of Larry - phthalo blue
(I bet you can guess who's next!)

My "Curly" underpainting is complete, I started "Larry" (but had to stop), and "Moe" will just have to wait...  The Stooges are funny, 
but the pain in my neck? Not so much.

I'm hoping to be back at my painting table soon, but in the meantime I leave you with a quote from "Twenty Five":


"Life is what happens while you are busy making other plans."
-John Lennon


p.s.  It's "Blogtoberfest", so please check back tomorrow for a post that answers lots of questions I've been getting about my underpaintings.


Thursday, September 27, 2012

Twenty Five and Twenty Six

John - raw and burnt umber

Yoko - paynes gray

25 and 26 of 29 underpaintings.

Three to go...

(Do you want to know what I'm going to do with all of these faces? 
Click here.)


Tuesday, September 25, 2012

Twenty Four (Process Pics Included)

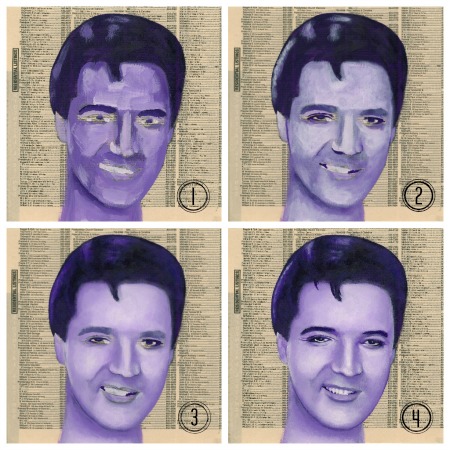
Presley E - dioxazine purple

24 of 29 underpaintings.

Many of you are curious about my painting process, so I took scans of my painting at different stages today...


(Do you want to know what I'm going to do with all of these faces? 
Click here.)


Monday, September 24, 2012

Twenty Two and Twenty Three

Pumpkin Head - phthalo blue

Groucho - phthalo blue

22 and 23 of 29 underpaintings.

I painted two today... I took the weekend off (again), so I'm catching up.

(Do you want to know what I'm going to do with all of these faces? 
Click here.)


Friday, September 21, 2012

Twenty One

Skull - dioxazine purple

21 of 29 underpaintings

(Do you want to know what I'm going to do with all of these faces? 
Click here.)


Wednesday, September 19, 2012

Nineteen

Pirate - paynes gray

19 of 29 underpaintings

Happy "International Talk Like A Pirate Day"!

(Do you want to know what I'm going to do with all of these faces? 
Click here.)


Tuesday, September 18, 2012

Eighteen

Marilyn - dioxazine purple

18 of 29 underpaintings.

(Do you want to know what I'm going to do with all of these faces? 
Click here.)


Monday, September 17, 2012

Fifteen, Sixteen, and Seventeen

Lion - raw (and a little burnt) umber

Pig - cobalt blue (mostly)

Lab - dioxazine purple

15, 16, and 17 of 29 underpaintings.

I took the weekend off for some desperately needed R & R, 
so today I needed to play catch-up with three underpaintings.

(Be sure to read my last post if you're interested in my plans for 
all of these faces!)


LinkWithin

Related Posts Plugin for WordPress, Blogger...