Tuesday, April 30, 2013

Tutorial Try-Out: Abstract Face


This week's Tutorial Try-Out was 
"How to Paint Abstract Faces" by raeart.
I have to admit I am so glad I chose a quick, splashy, and fun one for this week, because I had very little time for experimenting this week.

Spring has a tendency to turn me into a restless, easily distracted tornado.  Case in point:  This week I painted and tiled a bathroom (and that's only the beginning of my current DIY mania)!  So, since I am up to my eyeballs in home projects, I was happy to have a satisfyingly simple tutorial to try-out...


I think I would like to go back into this with some watercolor crayons and gesso, but that will have to wait... 
Today I'm tackling a project in Tyler's room!

Did you try this tutorial?
If so, please link up below.
(I can't wait to see!)

And, please be sure to read all the way to the end of this post to see what tutorial I'm trying next!


I am a huge fan of Lynne Hoppe, and her face painting how-to has been one of the tutorials at the top of my list for ages, 
so I figure there's no time like the present...
Lynn Hoppe's "how to paint faces" tutorial.


Kristin Dudish

Friday, April 26, 2013

Sketchbook Love (Still!)

A page from my sketchbook.

I love getting a peek into other artists' sketchbooks, and a glimpse into how they work!

So, today I thought I would share a page that was inspired by Tuesday's Tutorial Try-Out.  I often flip through old sketchbooks when I'm looking for inspiration, and notes like the ones I've made on this page sometimes end up being just the spark I need for a creative jump start!  (I generally don't worry about words bleeding through from the other side of the page because it's usually "for my eyes only" anyway.)

One of my very first posts when I started this blog a little more than 2 1/2 years ago (Wow - 2 1/2 years?!?), was titled "Sketchbook Love"... In that blog post, not only did I express my love for my sketchbook, I also explained the many ways I use it.
(If you're interested in learning more about my process, 
you can read that post here.)

I'm curious about your sketchbook(s)...
Do you work in just one at a time like me?  Or do you keep many?


Tuesday, April 23, 2013

Tutorial Try-Out: Easy Watercolor Portrait


I would like to start this post by thanking Carmen for suggesting I try out the Easy Watercolor Portrait tutorial at the Grow Creative blog.  It was simple, straightforward, and lots of fun...

I found the photos on pinterest. (Here, here, and here.)


I think the results were pretty cool, but I'm still playing.
(I have a feeling these watercolor portraits are just the beginning of something more...)

Did you try this tutorial?
If so, please link up below.
(I can't wait to see!)

And, be sure to read all the way to the end of this post to see what tutorial I'm trying next!


I found the next tutorial on YouTube, and since we're in portrait mode, I thought it might be fun to splash some more paint around for:
How to Paint Abstract Faces by raeart

Kristin Dudish

Thursday, April 18, 2013

"Flying Tulips" Stencil Test Drive


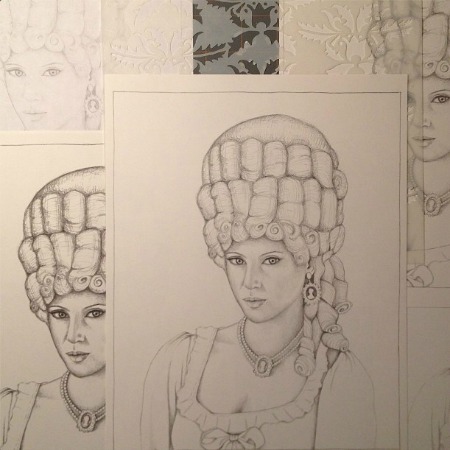
When Jessica Sporn's Flying Tulips stencil arrived in the mail, my very first thought was, "This would make a great french wallpaper background."

If you read my crazy haired ladies post, then you probably won't be surprised to know that my mind immediately went to the original crazy haired lady herself...


Marie Antoinette!

Combining Jessica's beautiful stencil with a crazy haired lady was a lot of fun.  I started by drawing her with just a simple mechanical pencil and photocopied my drawing at different darkess levels. 
(The original drawing is the one in front.)
(I revealed a similar technique here.)


Then, I played with different watercolor washes, inks, colored pencils, and of course, the "flying tulips" stencil!

My fun with Jessica's stencil wasn't limited to portrait backgrounds.  I also used her stencil for a couple of resist techniques, and for gelatin printing! (It's a very well-made and versatile stencil.)

(See how I created these here.)

Great big thanks to Jessica Sporn and Stencil Girl Stencils for the opportunity to participate in such a fun test drive!

And, please be sure to have a look at what else was created with
the "flying tulips" stencil:
Jessica's blog
Maria's blog


Tuesday, April 16, 2013

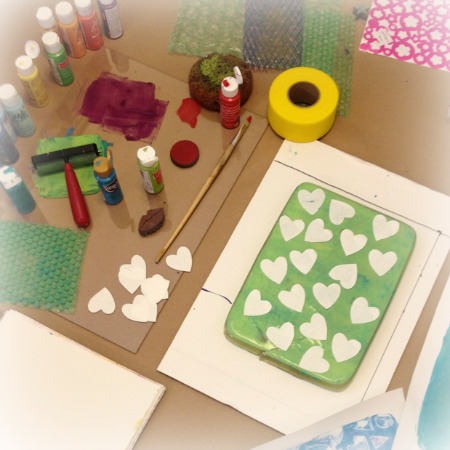
Tutorial Try-Out: Gelatin Printing


I am so glad that I finally tried gelatin printing thanks to Karen's post (and Linda Germain's site too)!


This was so much fun, and I think there are so many possibilities - this is definitely something I'll be doing more of!


(I think having a place to spread out is probably a plus!)


The results I got using Jessica Sporn's "Flying Tulips" stencil were pretty cool (it ended up looking like fabric).
Please be sure to stop back on Thursday - I'll be sharing more of the art I've made using Jessica's stencil, as part of her "test drive" blog hop.

Did you try this tutorial?
If so, please link up below.
(I can't wait to see!)

And, be sure to read all the way to the end of this post to see what tutorial I'm trying next!


Carmen suggested we try:
Grow Creative's Easy Watercolor Portrait Tutorial
Looks like fun to me...
So, let's give it a go!

Kristin Dudish

Friday, April 12, 2013

Crazy About...


Crazy Haired Ladies!


My first crazy haired ladies were inspired by Kristin at Twinkle Twinkle's Summer of Color Challenge last year.  (I created them on index cards for Daisy Yellow's ICAD Challenge.)

And, the very first painting I created in 2013 was...


(You guessed it!) A crazy haired lady!

I just can't seem to get enough of them...


And, I have a feeling this is only the beginning!


Tuesday, April 9, 2013

Tutorial Try-Out: Glue Collagraph

A Mommy-Tyler Glue Collagraph Collaboration

If you read my last post, then you know that Tyler was on Spring Break last week. So, for this week's tutorial try-out (Belinda Del Pesco's Glue Collagraph Tutorial), I had a helper...


Tyler drew pictures (using a sharpie marker) on matboard that was coated with gloss varnish.  I traced his drawings using Elmer's glue, straight from the bottle.


We let the glue dry overnight, then the next day we inked our plates using a brayer and Speedball water soluble black ink. (We printed the images on 140 lb. watercolor paper.)


When I was in college, the "second pull" was always my favorite, so we were sure to create "ghost prints" too!

(This was a lot of fun, and I'll definitely be doing it again, but I think I'm going to try different glues to see if I can find one that isn't as runny.)

Did you try this tutorial?
If so, please be sure to link up below.
(I can't wait to see!)

And, be sure to read all the way to the end of the post to see what tutorial I'm trying next!


It seems I've been bitten by the printmaking bug, so next week I'll be trying out a tutorial that has been at the very top of my list ever since I saw my friend Karen creating lots and lots of beautiful gelatin prints.
Gelatin Printing Using A Homemade Block by Karen at I am Rushmore

I am very lucky to have received a super fun zine from Karen that describes how to make a gelatin block in great detail.  But, I realize that not everyone knows how to make a gelatin block, so here is a link to a site that has directions (and answers many other gelatin related questions too):
Linda Germain's Gelatin Printing

Kristin Dudish

LinkWithin

Related Posts Plugin for WordPress, Blogger...